

Acrylics: Catalysts for New Advances in Gilding Restoration
In previous articles we have explored materials for gilding, preparation techniques, and the challenges of gilding in modern times. While the basic technique of gilding traces its roots to ancient Egypt and earlier, modern developments in sizes (adhesives), pigments, and protective sealers have opened a new chapter in how leaf is applied and protected. We will examine how these developments have been used on three very different projects to meet the challenges presented by their unique environments: The Church of the Holy Sepulcher in Jerusalem; the Smithsonian Institution’s Renwick Gallery; and the Washington Monument.
The Church of the Holy Sepulcher, Jerusalem
Background and History
In 333 C.E. Constantine, the first Christian Emperor of Rome, asked his mother Helena to embark on a mission to the Holy Land. She was charged with the task of locating the site of Christ’s tomb. Even though 300 years had elapsed since the crucifixion at Calvary and burial at adjoining Golgotha, the site was not hard to find. Local Christians had always worshipped there and the Roman administration had early on built a temple atop the site to discourage them. Helena had the temple removed, excavated Calvary and the cave which served as Christ’s tomb, and erected the first Church of the Holy Sepulcher on the site in 335. Long since destroyed, it was much larger than the imposing edifice that stands on the site now.
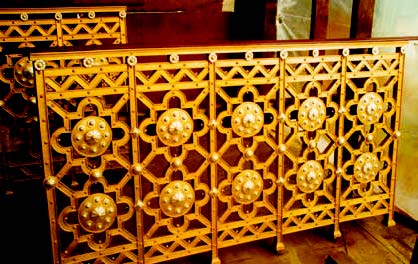
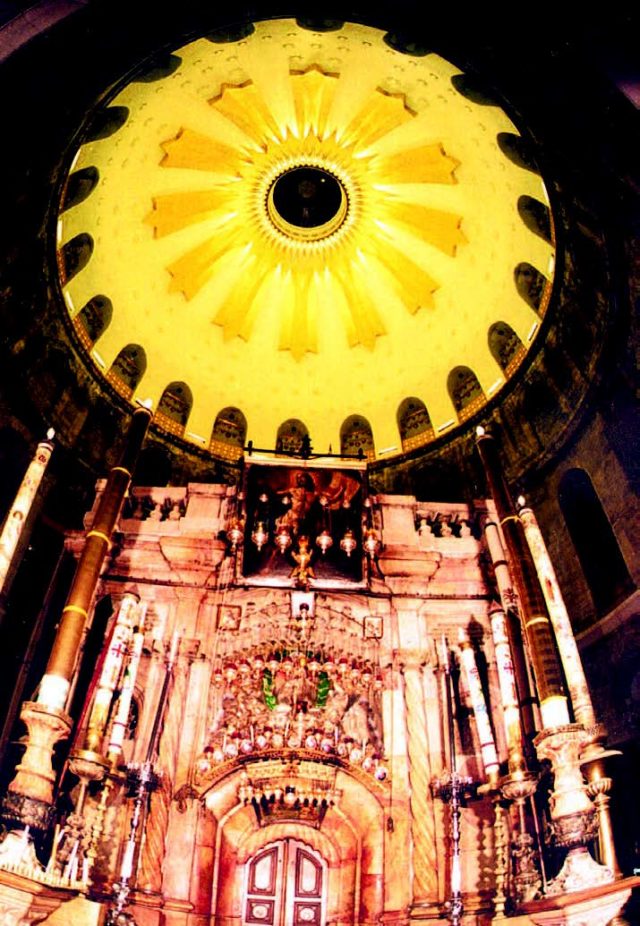
In the intervening years since Helena’s pilgrimage, the church was razed by Caliph Al-Hakim, rebuilt by the crusaders, and subjected to fires, earthquakes, and the general ravages of time. The structure that stands now dates to the Crusader church of 1099 and remains essentially unchanged. Originally open to the elements, the Great Cupola above the Edicule has undergone several transformations, with the most radical a result of the reconstruction during the 1860s, financed by the Czar of Russia. At that time, the exterior of the dome was clad in lead with a glass oculus atop, protecting the interior from the elements. The interior plaster was restored and elaborately decorated with painting and gilding. The Russian decoration lasted until the 1950s, when a fire severely damaged the interior of the Great Cupola and resulted in the rebuilding of the structure of the dome as well as the re-plastering of the interior shell. The only remaining decorative elements of the Russian contribution were the gilded wrought-iron cross atop the exterior of the dome and 20 elaborately gilded wrought-iron balustrades ringing the upper gallery with gold-plated lanterns, which hang above them.
The Latest Redecoration
The plastering of the dome was completed in 1976. Although funding was not a problem, the new decorating scheme for the Great Cupola was not agreed to until 1994. At that time, Ara “Corky” Normart, the artistic designer based in California, contacted the Gilders’ Studio regarding the gilded ornament, which was to be the major decorative element in the new design scheme. Corky’s design incorporated 12 large three-dimensional rays, each 25 ft. long and 8 ft. wide across the point. These “Main Rays” were 1 ft. thick on the edges and had a raised central spine that was 6 in. tall. Each ray was to have a raked texture in the centers with a smooth finish on the edges and sides. They radiated out from the 14-ft.-diameter oculus down the walls of the cupola and were complemented and joined together by a smaller ring of “Golden Tongues.” This element, which surrounded the oculus, had the inside edge toned with an umber glaze to provide visual depth. This ring was to be 6 ft. wide with a 14-ft. inside diameter. An “Inner White Ring” of painted stainless steel crowned the Golden Tongues. Combined with an elaborate lighting scheme, the total effect was breathtaking when viewed from the floor of the church, over 100 ft. below.
The mandate given to Corky and the team working on the Sepulcher was to use methods and materials which would last at least 100 years and maybe twice as long, because the scaffold would not go up again unless absolutely necessary. And that wouldn’t be anytime soon.
While the Great Cupola is no longer subject to exposure from the elements, it is unheated. Even though it is located in Jerusalem, it still gets cold in the winter and even snows on occasion. Needless to say, it is quite hot in the summertime during the days and can get chilly at night. All this produces substantial expansion and contraction in response to the thermal cycling. Combined with the sensitivities to temperature was the need to keep these large decorative elements as stable and light as possible, because they were to be attached to the ceiling.
Modern Materials and Techniques
The Gilders’ Studio recommended manufacturing all the large elements using GFRG (Glass Fibre Reinforced Gypsum), a lightweight, stable material that is easily produced, installed, and finished. It has been used with great success for almost 20 years to produce complex shapes and ornament throughout the U.S. and Western Europe. The Studio had gilded several projects made of GFRG with excellent results and felt very comfortable with the material. The rays and tongues were produced by Clark and Fenn in the United Kingdom and shipped to the Old City. Once there they were installed and finished by British plaster artisans.
As soon as the rays were being installed, the gilders were on site texturing the rays and preparing them for gilding. Since the GFRG is a gypsum-based system, there is no cure time as one finds with lime-based plaster systems. Once the joints had dried overnight, they were ready for priming.
Keeping in mind the mandate to use materials with the most longevity, it was felt the gilding system should incorporate ingredients that would remain stable and flexible for many decades. Gold is a noble metal and will not tarnish. An extra-heavy 23.5-Karat gold leaf was produced for the project by Manetti Goldbeaters in Florence, Italy. The additional thickness of the gold would help bridge and fill the texture on the surface of the elements. Also, the almost-pure alloy is extremely malleable and responds well to expansion and contraction.
After much research, the Gilders’ Studio decided to use a totally acrylic priming and gilding system for the project. Acrylic primers are compatible with the GFRG and gypsum texturing layers, and the acrylic gold size is compatible with the primers. One great advantage to using acrylic primers and size is that the flexibility in the coatings system will remain undiminished as time goes by. Traditional alkyd primers and oil-varnish (phenolic resin) sizes grow hard and brittle with age and will lose their resiliency after several years. An additional benefit of acrylic sizes is that they reach the proper tack to gild within one hour and stay at tack for 24 hours, allowing the gilders great flexibility in planning the progress of the work, which proceeded at a rapid pace.
In conjunction with the gilding of the new GFRG decoration, the custodians of the Holy Sepulcher wanted to move ahead with the restoration of the wrought-iron balustrades from the 1860s. Gilded in a combination of 12-KT “White Gold” leaf and 23.5-KT yellow gold leaf, the balustrades had languished in storage for more than 30 years. While the varnish atop the leaf had long since yellowed with age, the gilding and primer layers were well adhered to each other and the metal and did not require removal. Weighing over 450 pounds, each balustrade was 6 ft. long and had to be carried and installed by hand once the gilding was completed. This was one of the factors in determining which finish to use to protect the gilding.
Once the balustrades had been completely cleaned, the existing leaf and varnish layers were sealed with shellac to provide a reversible barrier coat, in the event that future generations will want to examine the layers on the pieces. After the shellac was dry, the areas to be gilded were sized using the same acrylic size as on the GFRG. They were then gilded with a combination of 12-KT and 23.5-KT gold leaf.
Normally, 23.5-KT gold leaf does not require a sealer. However, gold leaf is very thin and scratches easily; if used in an area where handling or traffic will occur, the leaf needs to be protected. In addition, 12-KT “White” gold leaf is 50% silver and will tarnish if not sealed. The use of a conventional varnish or even shellac to seal the gilding was considered but rejected, as these coatings are not very durable and the varnish will yellow, as will conventional polyurethanes.
The automotive industry has developed very tough and non-yellowing catalyzed urethanes as clear coats for automotive finishes. Some of these clear coats are guaranteed for the life of the car! The Gilders’ Studio had used these types of finishes on street-level gilded sculpture in Dallas and other locations,and was comfortable with their application and performance. The combination of durability and longevity made a catalyzed acrylic urethane the finish of choice as a protective sealer for the balustrades. Fully cured, these finishes are so tough it is difficult to scratch them with a key.
It turned out to be a good choice. The balustrades were undamaged in the move to the upper gallery and during installation. Furthermore, two years later workers using bosun’s chairs to clean the walls of the Cupola used the balustrades as anchors. The gilding survived intact.
Using traditional methods for the decoration and gilding of the dome and balustrades was certainly an option and may have been preferred by more convention-bound practitioners of gilding. But these materials have their shortcomings. Contemporary materials and methods were the best solution, given the unique nature of the project. While the political situation in the region is one of the most unstable in the world, we are confident the new decoration and gilding inside the Great Cupola will stand the test of time.
The Grand Salon of the Smithsonian
Institution’s Renwick Gallery
Background and History
In 1857 William Wilson Corcoran, a prominent Washington, D.C., banker, commissioned James Renwick Jr. to design a building to house his art collection. In 1859 construction began on the Second Empire-style building, the first in Washington dedicated to the display of art. Shortly thereafter the Civil War interrupted the plans for the gallery and the Corcoran Gallery was not dedicated until 1871.
The centerpiece of the building is the Grand Salon. Located on the second floor, the 4,300-sq.ft. room has a soaring 40-ft. ceiling with a clerestory above. This impressive space served not only as the “hall of paintings,” as it was often called, but also as a site for special events.
Towards the end of the century, Corcoran’s collection had outgrown the building. Land was purchased at 17th Street and New York Avenue, NW, for a larger structure, which became the present day Corcoran Gallery of Art.
The U.S. Court of Claims took over the original Corcoran Gallery in 1899. By the 1950s the Court needed larger quarters and proposed the demolition of the historic structure. First Lady Jacqueline Kennedy led the effort to save the landmark, and in 1965 the building was turned over to the Smithsonian Institution. Renamed the Renwick Gallery in honor of its designer (who also designed the Smithsonian Castle) it was dedicated “for use as a gallery of art, crafts, and design.” After several years of renovation, the building was reopened in 1972.
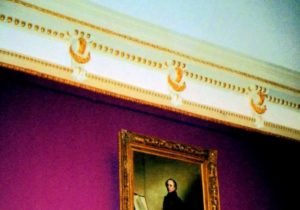
In 1999 the Grand Salon was closed for restoration and much needed maintenance. While the work prior to 1972 had returned the structure to its earliest configuration, the decoration and furnishings were not in keeping with the original Victorian decorative color scheme, which included salmon-colored walls, elaborate damask draperies, and gilded ornamental moldings.
“Flash” Gilding
While most of us think of gilding as the application of very thin layers of metal leaf onto a surface, another variety of gilding, done with bronze powders, was very popular in the Victorian era: “Flash” gilding. Bronze powders were manufactured in a wide variety of colors for use in mimicking actual metal leaf or shades of reds, blues, and greens, which were not available in leaf gilding. Elaborate stenciling on walls, ceilings, and objects was done with “Flash” gilding as well as architectural ornament. This process was also less expensive than traditional gilding, as the bronze powders were quite cheap and easy to work with, compared to gossamer-thin sheets of gold leaf.
In traditional “Flash” gilding, the surface was prepared in the manner for oil gilding and sized, but instead of applying leaf to the surface once it was at tack, the bronze powder was dusted onto the surface. Once the size had dried, the powder was usually sealed with a coat of varnish to prevent tarnishing. This finish was not known for longevity because the copper alloys in the bronze eventually oxidize and turn brown, as did the varnish of that era. But it did provide “Flash” for several years.
surrounding Victorian color scheme.
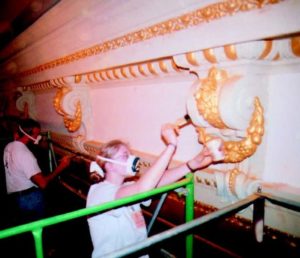
Paint analysis of the moldings in the Grand Salon determined that various elements had been “Flash” gilded in a color to simulate genuine gold leaf. These included the egg and dart, lambs tongue, and garlands around the corbels on the cornice. The clerestory had additional plaster elements that were also gilded with bronze powders. While the Smithsonian wanted to stay true to the original intent of the designer, the Institution did not want to use materials which would be short-lived, not to mention the health risks encountered by using bronze powders.
Modern Alternatives
Many of us have seen the striking finishes available in (again) the automotive industry. These include pearlescent finishes and chatoyant, shimmery colors on cars that change with the angle of light. The cosmetics industry has developed makeup and eye shadow which change color and shimmer as well. Pearlescent and iridescent colors are also quite popular in the art field.
These effects are all produced by tiny particles of titanium-coated mica chips, otherwise known as mica powders. Non-toxic and colorfast, they are available in a wide variety of shades and colors, making them an attractive and viable alternative to bronze powders for “Flash” gilding.
The shade picked for the work in the Grand Salon was “Mayan Gold.” This color most closely approximates 22-KT genuine gold leaf and was determined to be the nearest match to the original shade of bronze powder. The ornament to be gilded was very elaborate and the schedule was compressed for the project. An acrylic size was also chosen for this application. The combination of quick drying, long open time, and the non-yellowing properties of acrylics made it the best choice for use under the mica powders.
The “Flash” Gilding Process
Once the size was applied it was allowed to come to tack for an hour or so. After this time the size was evenly at tack and was ready to gild, even in the deeper recesses of the ornament (something a traditional quick oil size is not suited for, as it reaches tack on the outside of the ornament long before the inner recesses are ready, and even dries beyond tack on the high areas as opposed to the interior surfaces). The mica powders were dusted onto the surface with a brush and tamped down and burnished, as one would do with leaf gilding. The excess mica powder was removed with a vacuum cleaner. The particles are so fine they will float through the air and coat all the surfaces with a fine glittery layer if merely dusted off the surface and not captured. Even though mica powders are non-toxic, one still doesn’t want to inhale large amounts of the material, so dust masks are needed, as they are with some metal-leaf gilding and all bronze powders.
Upon completion of the “Flash” gilding, application of a sealer wasn’t necessary: The ornament is situated high above the floor, so there is no finger traffic to worry about. The mica powder is non-tarnishing and colorfast, so that is not an issue either. An added benefit is that the luster of the finish will not be diminished by application of a sealer on top — not an option with bronze powders; even with a sealer, bronze powders will tarnish within a decade or so. The new gilding in the Grand Salon will remain as new for many years to come, thanks to the cosmetic and automotive industries.
The Washington Monument Commemorative Stones
Background and History
In 1833 the Washington National Monument Society was formed and began raising funds to select a design and construct the monument. In 1848 work began on the Robert Mills design, but construction was interrupted due to financial setbacks in 1855. After that was the Civil War. Finally, after a hiatus of more than two decades, the federal government decided to finish the project. The Army Corps of Engineers began the second phase of construction in 1878, and after ten years of work, the Washington Monument was completed in 1888 and opened to the public. Clad with Maryland marble, it rises 555ft. 5-1/8 in. and is the tallest freestanding masonry structure in the world. For strength, the interior walls are lined with Maine granite up to 452 ft. Above that point it is all Maryland marble.
During the initial fundraising for the monument, the Society encouraged states and other organizations to donate tablets commemorating the First President. These stones were to be placed in the interior walls at different levels throughout the edifice. In all, 193 stones were produced and set into the walls. Many of the stones date from the 1850s, with others added periodically until 1982. Almost all the stones are carved. The stones are of varying materials, ranging from petrified wood to marble, limestone, and sandstone. Of these stones, at least 12 were originally gilded. The gilding was used on lettering and ornament, most of it incised into the stones. The Gilders’ Studio was chosen to work with conservators from the National Park Service to restore the gilding on ten of the stones.
General Condition of the Gilding and Tablets
The Washington Monument is a unique environment. As an obelisk, the walls are not vertical so water does not run straight down the sides. Because marble and granite are porous, it infiltrates to the inside as a result of slight hydrostatic pressure and through the mortar joints. Although the walls of the monument are very thick, this penetration is relentless. As the moisture travels through mortar joints and the layers of marble and granite, it picks up salts and minerals, which are eventually deposited on the interior surfaces once the moisture condenses and evaporates. Combined with this infiltration are thermal cycling and periodic episodes of condensation due to the uneven heating and cooling effects of the sun and the interior heating and ventilation system. At times there has been water running down the inside of the walls due to leaks and failed pointing. During the 23-year break in construction, the tablets already in place were subject to rainwater and freezing temperatures; tablets stored on site were probably subject to the same.
Prior to the 1934, 1964, and 2000 restorations, water penetrated the monument through open joints and poured down the interior walls during heavy rainstorms. An additional problem was human intervention in the form of improper cleaning methods and vandalism.
All these factors produce varying degrees of stress on the stones and the finishes on the stones. As the stones are of dissimilar materials, they react distinctively to the moisture levels and temperature changes.
Aside from the deposition of salts and minerals onto the surface of some of the stones, there was also extensive spalling and exfoliation on certain stones, to the point where the original carving was non-existent. Thankfully, this condition was not widespread, but it was very apparent, especially on some of the sandstone tablets.
Some stones had virtually none of the gilding or primers left in the letters — the remnants were so small as to be detected only with magnification. Other stones had much of the original gilding and coatings intact. As part of the 2000 restoration project, stones that had the physical remains of original gilding were to be re-gilded. Original remains were to be coated and isolated from new materials.
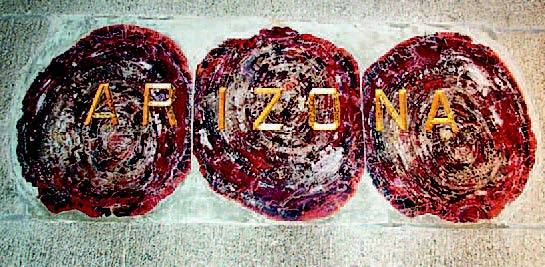
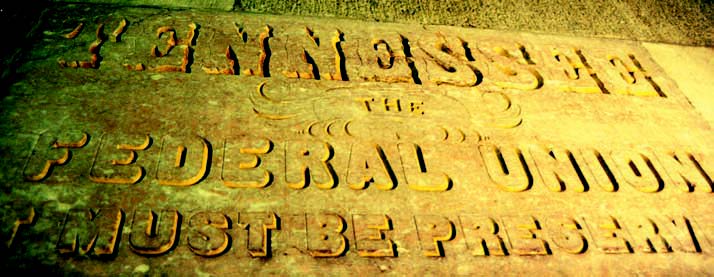
The stones are of varying ages and placed at different levels of the monument. The Hawaii stone, produced in 1935, was installed at level 360. Made of coral sandstone, the lettering was incised and gilded. At this level it was the highest placed of the gilded stones. There was no visible gilding remaining on the stone. At level 320 the Arizona stone, of petrified wood, had over 80% of the original gilding intact. The Arizona stone dates from 1924, more than ten years older than the Hawaii stone, 40 ft. above. The marble stone from Tennessee was produced in 1851 and elaborately gilded. Set at level 230, approximately 20% of the original gilding was still intact. The granite tablet from the city of Wales, up on level 240, had virtually none of the gilding extant, which was the case for the majority of the stones. Most of the original gilding was lost.

The gilders and conservators needed to develop a re-gilding system that would be durable enough for this challenging environment. First, the system had to be reversible. The idea was to isolate and preserve the original gilding underneath the new gilding, so the primer and size had to be compatible with the isolation layer and also soluble in a solvent different from that used for the isolation layer. Second, the system had to allow for the transmission of water vapor. Traditional oil primers and size have very low permeability ratings and will form an excellent vapor barrier. Any moisture behind these coatings with even a slight pressure will eventually push them off the surface. Gold leaf in an unbroken form is also a vapor barrier. But the leaf in the carvings was always broken during the gilding process and “double” gilded.
The resulting layer consisted of the combination of many small pieces of leaf and almost a powder rather than one continuous sheet, thereby allowing any moisture to escape.
Unlike the Holy Sepulcher, where the work was essentially in a protected interior environment and moisture wasn’t a problem, the Washington Monument was best approached as an exterior project. An exterior acrylic gilding system was chosen as the most suitable solution. The exterior acrylic primer was compatible with the isolation layer and had a permeability rating which allowed the transmission of water vapor. An acrylic exterior size from Germany with essentially the same permeability as the primer was chosen as the adhesive for the gold leaf. The team was confident this system would provide both durability in the challenging environment and reversibility, while protecting the remnants of original gilding.
The stones were inspected and cleaned by conservators from the National Park Service. The existing gold was examined to best match the original color and alloy. Original layers and fragments of gold leaf and primers were coated with a layer of Soluvar Matte varnish, to isolate the original materials from the primer for the new gold leaf.
Gilding Restoration
Surfaces to be gilded were primed with a light-yellow exterior acrylic primer. The German acrylic size was applied over the primers, and on top of this layer the gold leaf was applied. While most of the stones were completely re-gilded, Arizona was gilded only in the areas where the original gilt was missing. An alloy was chosen that was closest in shade to the original, and after the gilding was completed the new leaf was toned to blend with the existing leaf. The remaining stones were gilded with different alloys of 23.5 and 23.75-KT leaf, to match most closely the original colors. The Florida stone was gilded with Palladium Leaf instead of the original silver, as the silver turns black in short order and the Palladium will keep its silvery color.
Only time will tell if the conservators and gilders made the right choices. The decision to use a modern acrylic system was based on the best information available and in response to the conditions present in the structure.
We do know that traditional priming and sizing methods were out of the question. The project was well documented, so future conservators and gilders will be able to understand our methodology and choice of modern materials for this particular project.
Conclusion
Coatings technology has made great strides in the past three decades. Modern pigments and acrylics have burst on the scene and attained widespread acceptance in the restoration and high-performance coatings fields. As restorers and conservators, we need to keep up with new developments in our field and also outside our field. Faced with the challenge of maintaining our national and world heritage for future generations, we need to look not only to the past for tried and true methods, but to the present for modern technologies which will preserve the legacy and tradition of ornament for many years to come.
* Special Thanks to Judy Jacob of the National Park Service for her assistance with the section dealing with the Washington Monument. Michael Kramer is the Founder and President of The Gilders’ Studio, Inc., located in Olney, Md. Known for its expertise in architectural gilding, the Gilders’ Studio works across the U.S. and overseas, and recently completed the Cathedral of the Immaculate Conception in Kansas City as well as the 1st Division Memorial in Washington, D.C. Mr. Kramer teaches gilding at the Smithsonian and other venues nationwide. His chapter on “Exterior Architectural Gilding: Methods and Methodology from Historic Times to the Present” was included in the recently published book Gilded Metals , available from the American Institute for Conservation and from Archetype Publishing.